Set up Enhanced Automatic Topics so Gladly AI adds Topics to every AI Session when it ends or transfers. You turn it on for each Gladly Agent, build a Topic list, and choose how many Topics a Session can get.
Enhanced Automatic Topics is currently in Beta (Early Access)
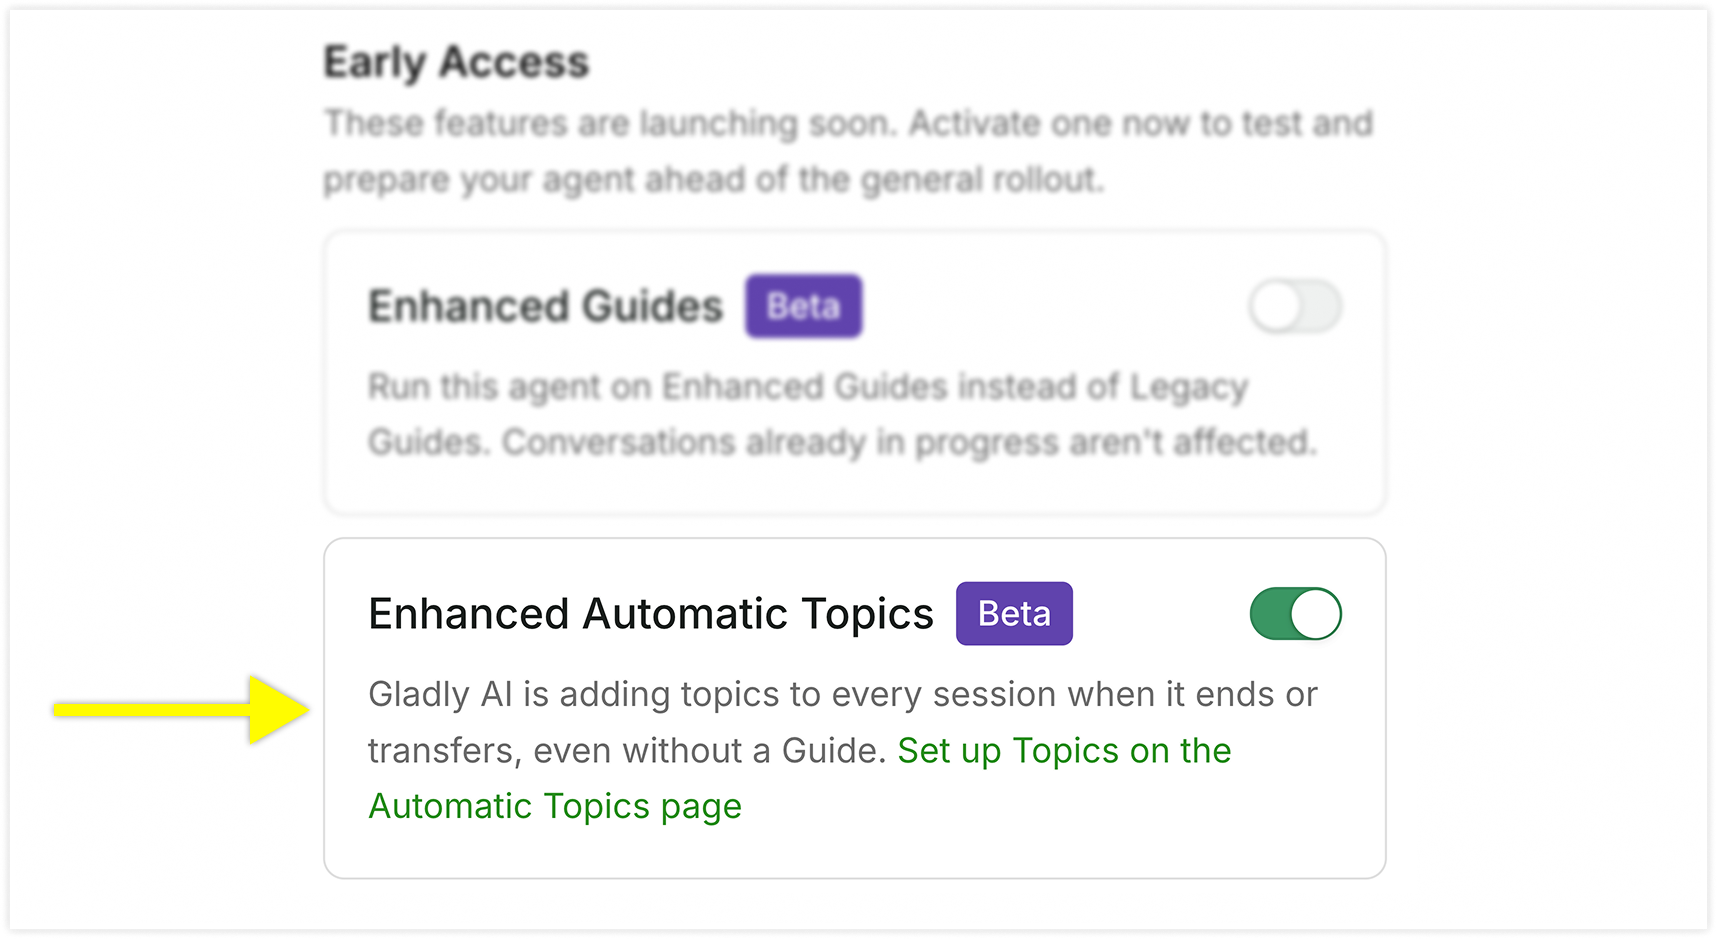
Our team is watching closely, and your feedback shapes how it works. If you notice anything unexpected, let your Gladly account team know. To get started with Enhanced Automatic Topics now, go to Basics > Early Access > toggle Enhanced Automatic Topics on. This must be turned on for each AI Agent.
For the original version of this feature, see Add Topics Automatically.
Turn on Enhanced Automatic Topics
Enhanced Automatic Topics is set up for each Gladly Agent, not across your whole organization. Turn it on for each Gladly Agent you want to use it with.
From AI Agents, select the desired Gladly Agent.
Select Basics.
Scroll down to the Early Access section.
Turn on the Enhanced Automatic Topics toggle. The description changes to "Gladly AI is adding topics to every session when it ends or transfers, even without a Guide."
To go straight to setup, select Set up Topics on the Automatic Topics page.
Repeat for your other Gladly Agents.
Once it's on, Gladly AI adds Topics to every Session when it ends or transfers, even without a Guide.
Turn off Enhanced Automatic Topics
To turn it off, switch the toggle off in the same place.
If you used Automatic Topics before, turning off Enhanced Automatic Topics switches you back to legacy Automatic Topics.
If you're new to Automatic Topics, turning it off stops Gladly AI from adding Topics altogether.
Set up your Topics
Your Topic list and descriptions are what Gladly AI uses to decide which Topics apply. Each Gladly Agent has its own list, with up to 250 active Topics.
Leave out Topics a Guide already covers
Automatic Topics fills in the gaps. If a Guide always handles one contact reason, apply that Topic on the Guide and keep it off your Automatic Topics list. For example, apply Track Order to your Track Order (WISMO) Guide. Use Automatic Topics for contact reasons no single Guide owns, such as Product Defect or Sizing Question. Keeping the two separate avoids overlapping Topics, which makes results harder to tune.
I haven’t applied it to the Set Up article yet. Say the word and I will. The open question for the product team (what actually happens under Enhanced if you duplicate a Topic) still stands.
Open the Automatic Topics page
From the Gladly Agent's page, select the Automatic Topics tile.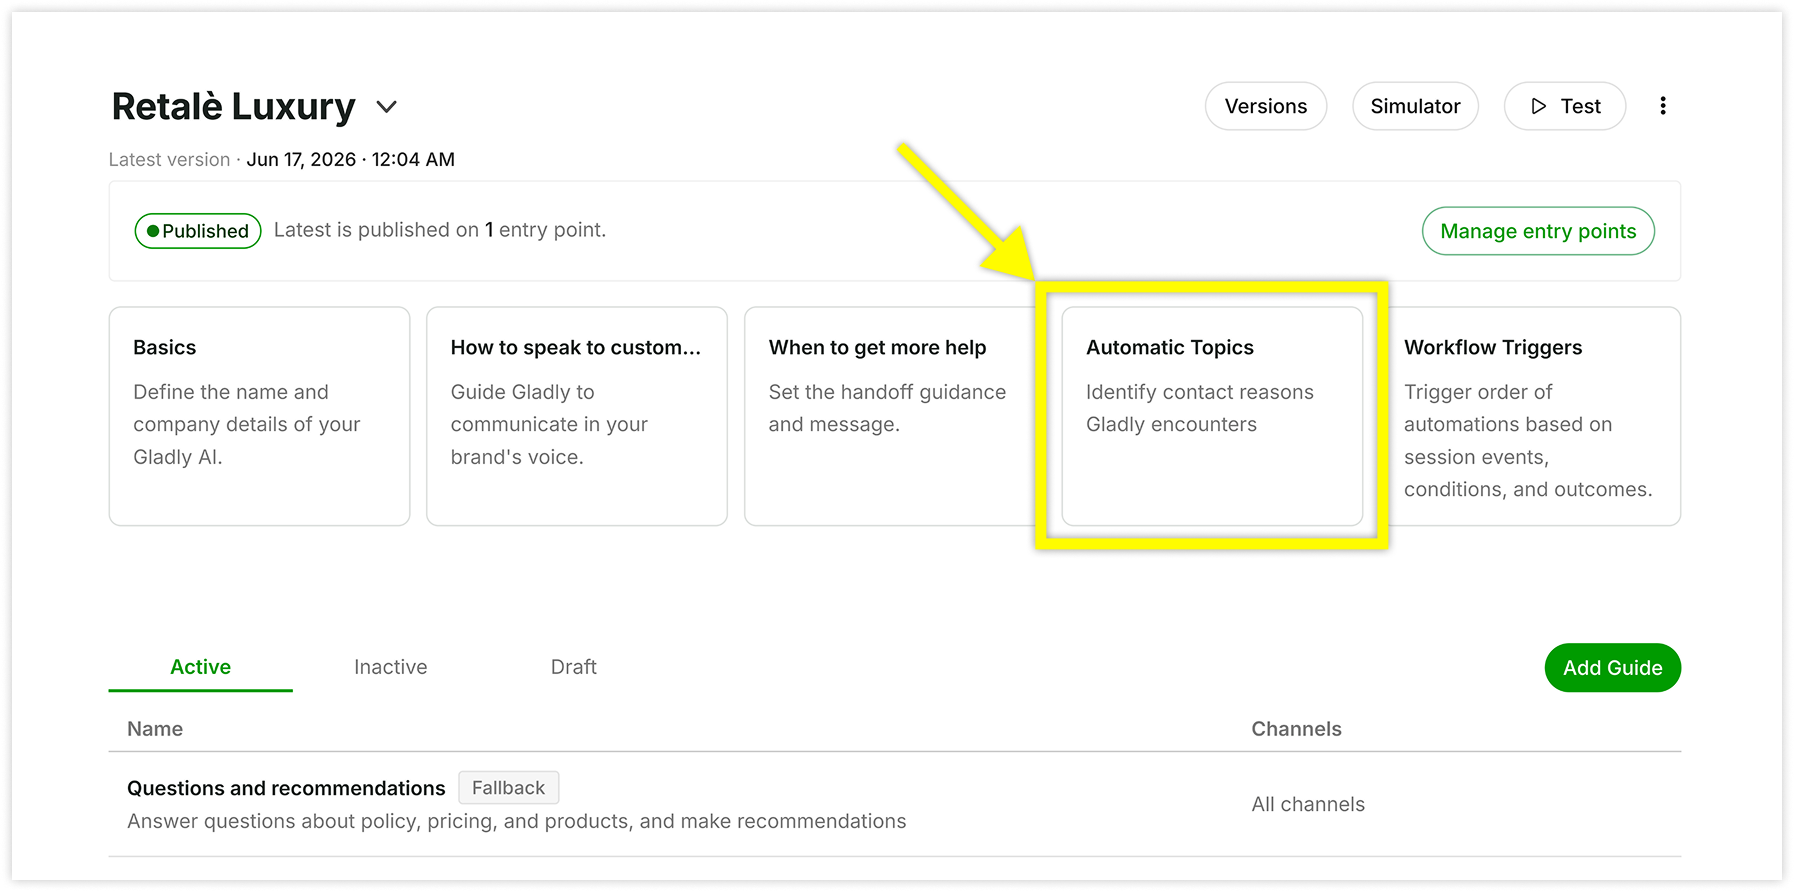
Once set up, the page has two tabs: Topics and Settings. The Topics tab shows the number of Topics, for example Topics (5).
Build your first Topic list
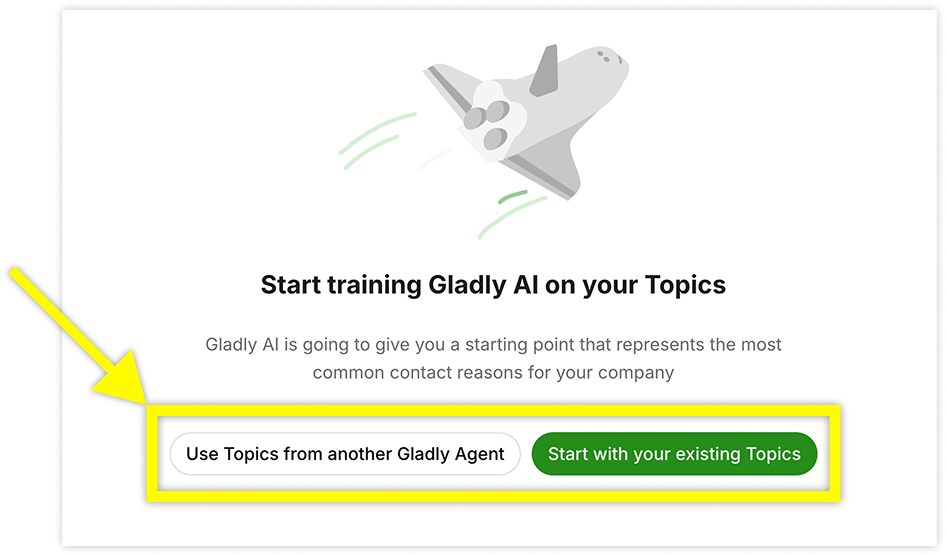
The first time you open the page, Gladly walks you through setup:
Select Start with your existing Topics to use the Topics from Settings > Topics as a starting point, or select Use Topics from another Gladly Agent to copy the Topics and descriptions from a Gladly Agent you've already set up.
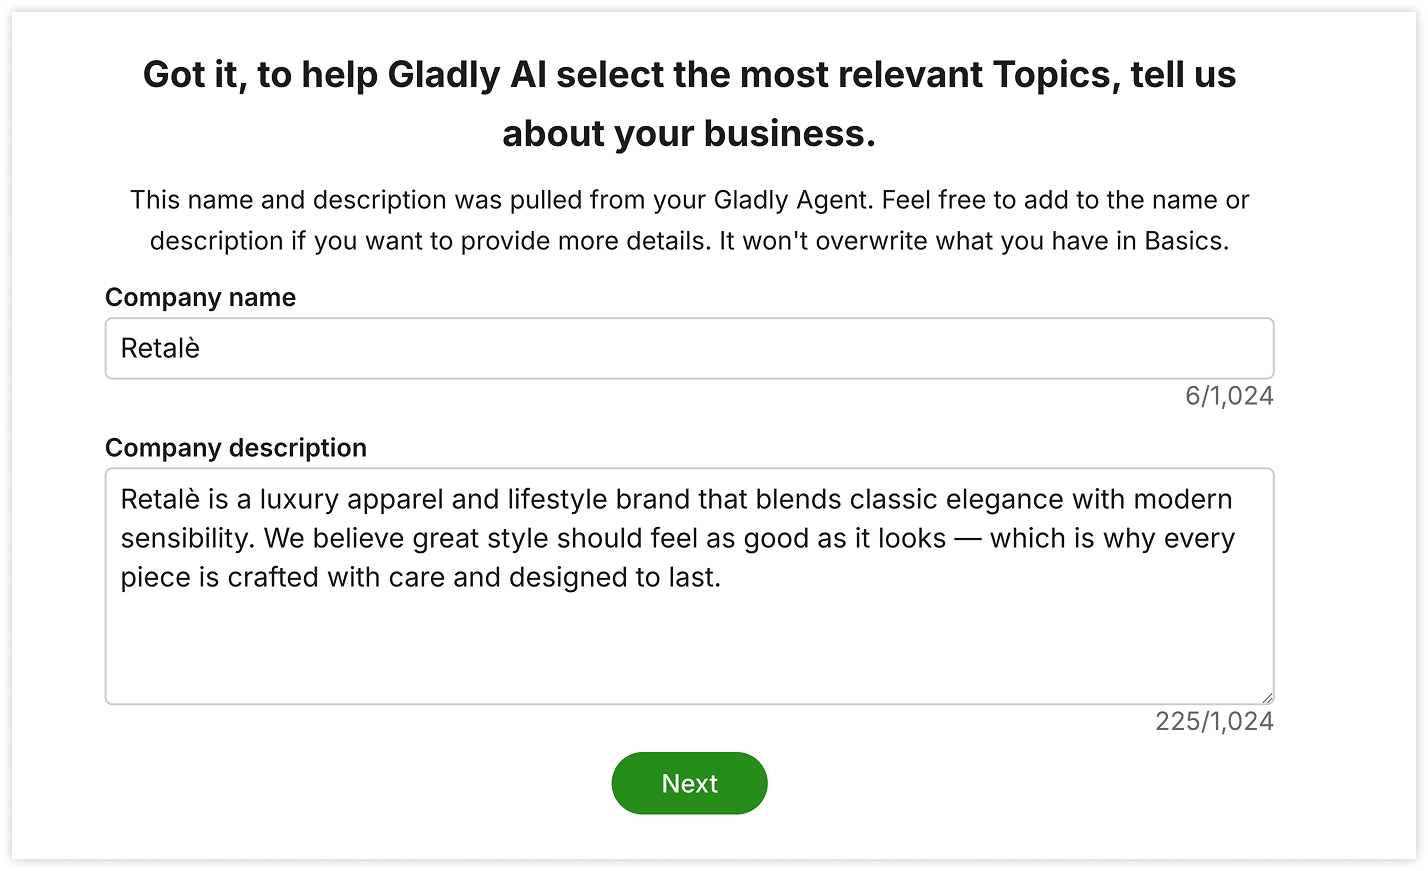
If you chose your existing Topics, confirm the company name and description Gladly uses to select the most relevant Topics. These come from your Gladly Agent's Basics and won't change what you entered there.
Wait while Gladly curates Topic suggestions and writes descriptions. When the list is ready, select Review Topic List.
Add a Topic
On the Topics tab, select Add Topic.
Choose an existing Topic from the list, or select Add new Topic.
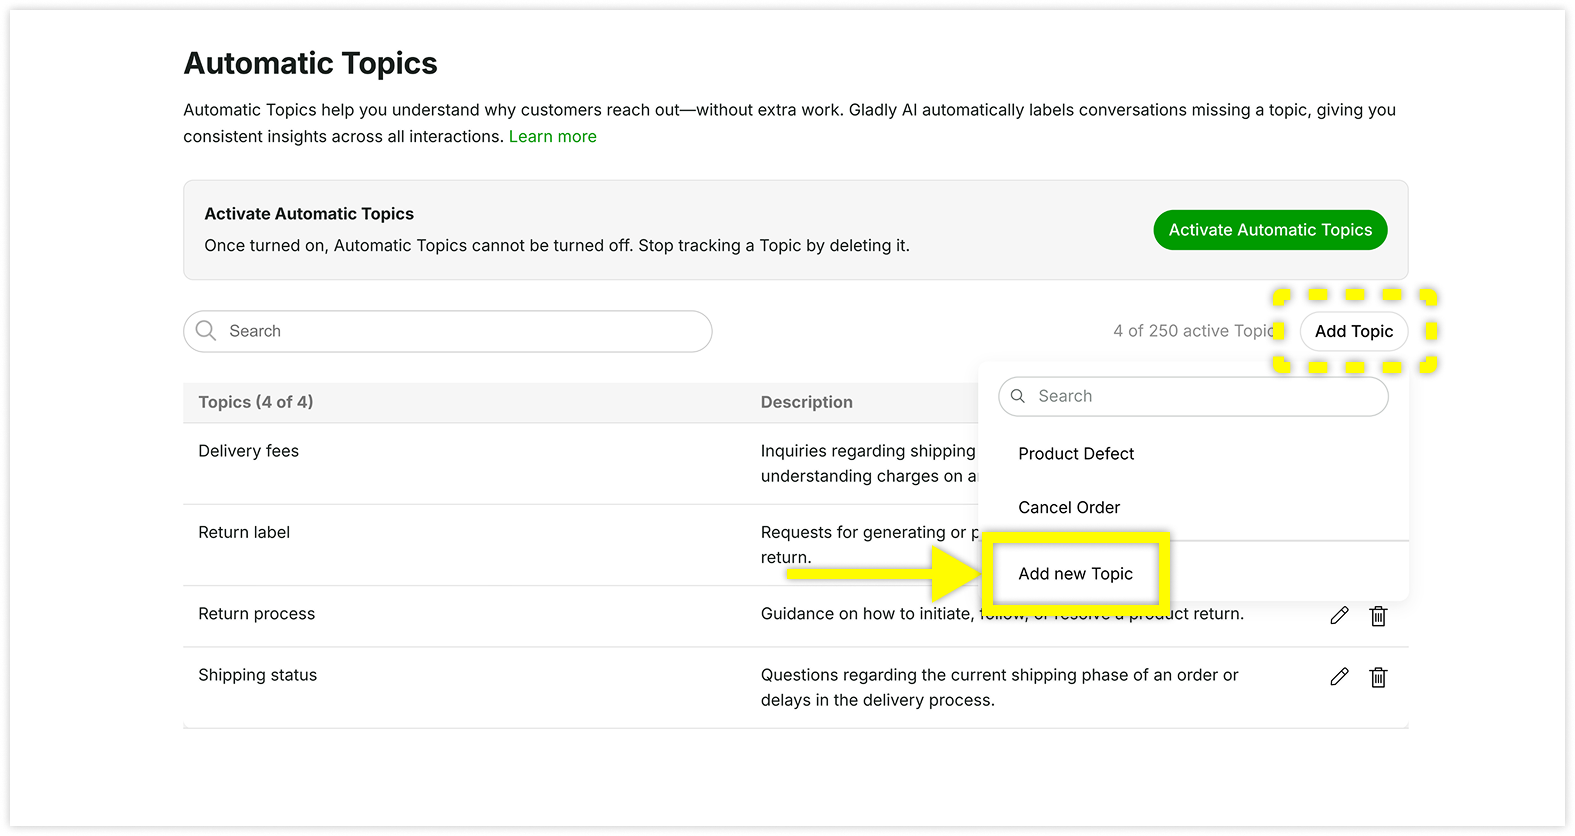
Enter a Topic name, if you're adding a new one.
Enter a description. Every Topic needs a description, up to 250 characters.
.png?sv=2026-02-06&spr=https&st=2026-11-19T21%3A03%3A19Z&se=2026-11-19T21%3A18%3A19Z&sr=b&sp=r&sig=RoygLYXS1R1%2F3Yv1TJJ3sd4MZRRpZfiag1fyK2ta8Xc%3D)
Select Done.
Follow these best practices when you name your Topics:
Focus on customer intent. Name Topics based on what the Customer wants to do, for example "Request Refund."
Avoid overlap. Make each Topic distinct. Similar Topics, such as "Broken Item" and "Product Defect," confuse the AI.
Start broad, then go narrow. Begin with a few key Topics that cover most of your volume, then add narrower Topics based on performance.
If a Topic name contains an acronym, such as BOPIS or DMP, define it in the description so Gladly AI knows what it means.
Edit or delete a Topic
To edit a Topic's description, select the pencil icon next to its name, update the Description, and select Done. To change a Topic's name, go to Settings > Topics, because Gladly uses the same Topic names across Agents, Rules, and AI. To stop Gladly AI from adding a Topic, select the trash icon next to it. This removes it from the Automatic Topics list only. The Topic stays available in Settings > Topics for your team.
Choose how many Topics a session can get
Choose the maximum number of Topics Gladly AI can add to a single Session. Gladly AI adds up to this many Topics, keeping the strongest matches.
On the Automatic Topics page, open the Settings tab.
Under Topics per session, select a number. The default is 1, and you can go up to 5.
Select Save.
Review the Topics Gladly AI added
Check what Gladly AI added to spot anything that needs tuning.
AI Sessions. The Topics column on the AI Sessions page lists the Topics added to each Session. Use the Topics filter to pull up every Session a Topic was added to. See AI Sessions Overview.
Conversation Review panel. Open any AI Session to see Topics added to this conversation. It shows every Topic added, whether it came from Enhanced Automatic Topics, a Workflow, or a manual Topic in a Guide. Select a Topic to read its description. See Review and Inspect AI Responses.
Conversation timeline. Topics Gladly AI adds also appear in the Conversation timeline, for example Topic Product Defect added by Gladly AI, as well as in the Conversation header, at the bottom of the Conversation, and in the Customer Profile's conversation list.
Topics report. This is the best place to see overall trends. It includes Topics added by Gladly AI and by your team, so it can't show which one added a Topic. To track AI Topics on their own, set up separate Topics just for Gladly AI.
The review list shows what Gladly AI applied
AI Sessions and the Conversation Review panel show the Topics Gladly AI applied in each Session. Topics your team or rules add or remove later don't change this list. If a Topic's description looks right but it's still being added incorrectly, let your Gladly account team know.
Write great Topics
Clear Topics and descriptions lead to accurate results.
Write a clear description. Gladly AI reads the description to decide if a Topic fits. Say what the Customer is asking about, in plain words.
Make each Topic stand alone. Gladly AI checks each Topic on its own, so catch-alls like "Other" or "None of the above" won't work the way you'd expect.
Describe Topics fully. Gladly AI doesn't see your Topic hierarchy, so don't rely on a parent Topic to explain a child Topic.
Keep your Gladly Agents in sync. Topics are set per Gladly Agent and don't sync between them. If you have more than one, update each one.
For more on what Gladly AI can and can't do with Topics, see What is Enhanced Automatic Topics?